Floors That Need Help
-If your carpeting should really be thrown out, here is an inexpensive alternative to spruce things up for about $10.00-$25.00 or $60.00 if you want to take extra steps. Just something to consider if you can not afford to replace what is currently there.
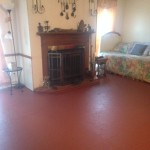
When I bought my home last year it had no carpeting. The sub-floor was all there was. Just OSB and vinyl in the bathrooms and kitchen. The house was perfect for me, and my needs. It was far from beautiful, but as long as I had a roof over my head and a place my children could call home, I was happy. I love my house, because it’s “home”. In the family room the floor was painted white, with a rather large Rebel flag painted on it in the middle. I figured I’d soon be able to cover it with carpet and it could lay buried beneath it, there was no need to remove it right away. Kind of tacky to be there on the floor, in front of my fireplace, ya’ know. Well circumstances changed and I was not able to get carpet installed, so today, just about a year after I moved in, I decided to do something about it. My daughter was coming to live with me while she attended college near by, so she could finish her education. She graduated at a local community college with honors this last spring, so proud of her. I never had any company, because I don’t know hardly anyone, since I moved to this area a few years ago, so I didn’t do anything with the floor. I hate to spend any money, that is not absolutely necessary. My daughter will be sleeping in this room, so I figured I make it look nice for her. Looks so much better. I was able to find a nice floor paint for only $10.00 to do my floor with and got a nice beige color to paint my walls in my bedroom some day, for $10.00 as well. $85.00 worth of paint for $20.00, I’m very happy with my savings.

My Family Room Floor – Before
To do this project you will need;
paint
paint roller
paint brush
roller tray
4-6 inch drywall scraper
floor leveler (optional)
You may also need a hammer and a standard screwdriver
Take a peak under your existing floor covering to see what your going to have once you remove the old carpet. It should be easy to lay back down and put back in place if it has a sub-floor you simply can’t make this work well enough, to look better than what you already have. Just go to an inconspicuous place on the floor by one of the walls and carefully pry and pull the carpet away from

Family Room 10 hours later
the tack strip (if you have one, it may be stapled as well). If the floor is in rough shape you may put the carpet back and find another alternative.
Once you remove all carpet, pad, tack strips and staples or nails, use the scraper over the entire floor to remove any loose particles Find any thing you may need to remove, that may be sticking out of the sub-floor. Vacuum the entire floor and around baseboards. The floor has to be clean and dust free. Take a slightly damp mop over it, just for good measure and allow to dry completely. If you want a nice smooth surface and the sub-floor is in pretty good shape, you can use your scraper to skim some floor leveler over the entire surface, following the directions provided with the product you choose. Make sure it is completely dry and cured before priming it. Sand the areas that you have applied leveler to, nice and smooth once it has dried and spot check areas that need a bit more leveler.
**If you choose to use floor leveler, you will have to prime the floor before you paint after you have sanded it nice and smooth.
After floor is ready for primer and/or paint, use your brush to cut in around the edges of the room, be sure to feather it out on the outside edges, so it will blend well when you roll out your paint. Use tape to protect anything you wish to protect. After entire room has about a 4-6 inch wide border of paint, your ready to roll. When rolling your paint out, do small 6’x’6 foot areas or smaller,(depends on how much paint your roller holds) also feathering the edges and roll it the same direction, so figure out which way you need to roll the room to allow you a way out. After first coat dries so you can walk on it, put an old pair of socks on (to avoid slight sticking and to insure you will not leave any foot prints) while your walking across the floor to roll out the second coat. Cutting in should not be necessary if you did a good job the first time around. A brush tends to put a bit more paint on the surface.
You will be able to do several coats to an average 12′ x 15′ floor, with a gallon of paint . This will protect the sub-floor and will continue to protect once you put carpeting down. It will allow you to mop it and even touch it up, if your sure to store your remaining paint in an air tight container. Store it, so that it is protected from extreme heat and freezing temps. Shake it up now and then as well, at least twice a year. Be sure the paint cures very well before putting your furnishings back.
Resources – Cheap Paint
You can get some pretty cheap paint, at any paint store that mixes paint for their customers. They will have oops paint or a turkey bin, for paints that were mixed incorrectly or the customer decided they didn’t like the color once it dried or before it even had a chance to. These paints, usually are very nice quality paints and can be purchased for between $5 and $10. You do not have a choice of colors, but most colors are really pretty nice. You can always keep checking till you get a color you really like and do your project once you have your paint. You can also contact a painting contractor and let them know what your project is and they may have paint they need to get rid of for free. Beats paying to have it disposed of properly. Habitat for Humanity has many resale stores across the nation, see if there is one near you. This is also a good place, to find your home improvement, project needs.
Tips

Example
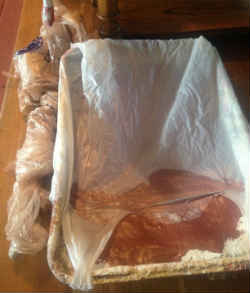
If your using a water base paint you can store your roller and or brush in the refrigerator (freezer for longer storage, removing as much paint as possible first), if you are going to use it again in the next week or so. Beats cleaning it. Simply wrap it tightly in plastic bags, removing as much air as possible. The plastic should stick nicely to the wet paint to keep air away. When your ready to use it again, just take it out for about an hour before you will need it, leaving it wrapped. Remove your plastic and throw it away, when your ready to begin painting again. If you are going to do more than one coat, you can simply wrap them up and set them aside until your first coat dries well enough to apply second coat. You can also carefully place your paint try in a plastic bag as well between coats. (see example) Lightly press the bag to the slope of the tray to keep air out if your bag is too small to cover entire tray. Keep in mind, when you apply a second coat, it will soften the first coat, so it will take twice as long to dry so you can walk on it and should cure over night for best results.
Suggestions
Another inexpensive alternative for your floors is floating vinyl. You only have to glue the edges, it does not tear or crease easily. It’s fairly thick, which makes it slightly padded and nice to walk on. I often find this on sale for around $4.29 per linear foot – 10 foot wide rolls. You can often find remnants pretty cheap, for smaller rooms such as bathrooms or laundry rooms. Because you only glue the border it will float above divots and imperfections of the sub-floor, so you may not need to lay luan first, like you would with the thinner vinyl. This floor covering will also lay over your existing vinyl even if it has a slight texture to it.
After painting the floor, you could also consider getting something like these carpet tiles from home depot to place a large “rug” of carpeting in the center of the room. You can just do the area you wish to cover or have some floor sitting comfort. A freshly painted floor would be a perfect foundation to stick these tiles to.